What is the core combat loop in Silver Palace?
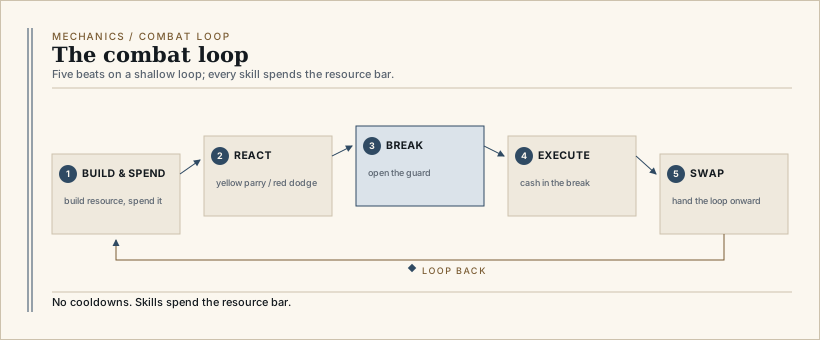
The loop has five steps, and every fight in the game is a variation on them:
- Build and spend. Basic attacks, charged attacks, pursuit attacks and counters each add to a resource bar with a character-specific name. Skills consume that bar instead of waiting on a cooldown.
- React. Enemy attacks are telegraphed by ring colour. Yellow means you can parry; red means you must dodge.
- Break. Damage and successful parries fill the enemy's Stun Buildup meter. When it fills, the enemy enters a stunned state.
- Execute. A stunned enemy can be finished with the execution input. Executions deal heavy damage and leave the party in a better position for the next phase.
- Swap. Swapping with a charged Reactor gauge triggers the incoming character's Tactical Assault. This is where team damage comes from, not from matching elements.
If you only remember one thing: attacking is defence. The resource you build while pressing the attack is the same resource that lets you interrupt, shield or burst at the right moment.
How do parries and dodges differ?
Both defensive options sit on the same read — the colour of the ring around the incoming attack — but they reward different things.
| Signal | Correct input | What you get |
|---|---|---|
| Yellow ring | Parry before the hit lands | Reduced damage, an immediate counter, and the combo continues instead of resetting |
| Red ring | Precise dodge | Full avoidance and a perfect-dodge window; several characters get a free follow-up from it |
| No ring, long wind-up | Interrupt or reposition | Often a cast you can cancel with break damage or a Tactical Assault |
Parries are the higher-value input because they preserve momentum. A parry does not break your basic-attack chain, which matters for characters whose third or fifth hit is the one that generates their resource. Dodging is safer, but on most kits it ends the chain and forces you to restart at hit one.
Tap block and double-tap dodge were the same key in CBT1. CBT2 split them into two separate inputs, so bind them apart on a controller and do not try to carry over muscle memory from the first test.
How do you break an enemy and trigger an execution?
Every elite and boss has a second bar under the health bar: Stun Buildup. It fills from damage, from parry counters and from specific break-oriented skills. When it fills, the target drops into a stunned state and the execution prompt appears. Press F while you are close enough and the animation plays out.
Three practical notes:
- Do not spend the stun window on a basic attack. Execute first, then unload your largest skill into the recovery frames.
- Break damage is a role, not a stat. Lorin and Captain Kaboom are built around filling the bar quickly; putting one of them in the party shortens every elite fight.
- Some enemies only become executable after a phase change. If the prompt never appears on a boss, check whether you are still in its armoured first phase.
The official combat feature list also names Weakened States alongside Resonance Effects. In practice a weakened target takes more damage and is easier to stagger; treat it as the window after a break rather than a separate mechanic.
Do skills have cooldowns?
No. Silver Palace uses resource bars instead of cooldowns. Each character has a named bar — Ammunition for the Detective, Rage for Rex, Street Smarts for Lorin, Pressure for Captain Kaboom, and so on — and skills spend from it. Some skills have multiple charges, and a few characters carry a second bar that unlocks an upgraded charged attack.
The consequence for playstyle is simple: anything that increases hit frequency increases your skill frequency. Fast multi-hit basic attacks, pursuit attacks after a dodge, and parry counters that preserve the combo are all effectively cooldown reduction.
What do the resource bars look like across the roster?
Every bar is named, and the cap tells you what kind of kit you are playing. A low cap with a large spend is a burst kit; a high cap with steady income is a setup kit. This is the one consolidated table on the site — the per-hit generation and damage numbers stay on each character's build page.
| Character | Resource | Cap | Main generation | Spend gate |
|---|---|---|---|---|
| The Detective | Ammunition | Not published | +1 on hit 3, +2 on hit 5, +1 on Lv2 charge | 1 per Raven Slayer |
| Alf | No published bar | — | No published resource data | — |
| Argos | Confession | 12 | Cane and Spirits string | Skill consumes all, opens Piercing Gaze |
| Cinderella | Vengeful Flame / Overheat | 120 (Overheat) | Basic 2/3/5/5/5; Quenched 15/15/30/60 | Empowered charge consumes all Overheat |
| Cynthia II | Sweetness | 100 | +6 per second, on or off field | Skill tier depends on amount held |
| Lorin | Street Smarts | Not published | Basic 5/5/20/10/20; Sway perfect dodge +20 | Skill routing |
| Firtho | Special Serum | 10 | +1 per second | 2.5 per cast, 10 for a full hold |
| Red Rose | Rose Petals | Not published | +1 on hit 3, +2 on hit 5, +1 on Lv2 spin | No published cost |
| Gratia | Muscle Memory / Stalwart Fury | Not published | Muscle Memory on hits 4–5; Stalwart Fury from blocking | Full Stalwart Fury releases Shield Rush |
| Rex | Rage / Volt Charge | 120 | Basic 4/12/14/20; pursuit 15 per hit | 60 per truncheon skill |
| Bentham | Funds / Liquid Assets | Not published | Basic 1.5/3.2/6/10; circle 0.3 per hit | One asset per boosted hit |
| Grimm | Camera Battery | 40 | +4 per second; basic 2/2/2/5/5 | 20 for quick shot, full for charged |
| Captain Kaboom | Pressure | 90 | Basic 5/10/10/40 | Tier every 30 above 30 |
| Gucia | Erudition | 300 | Basic 10/20/10/20; +40 on cancel | Bands under 100, under 200, 300+ |
Four routing patterns cover almost every kit, and they explain why the same rotation does not work on every character:
- Chain protection. The Detective's damage is back-loaded onto hit five, so a parry that preserves the string is worth more than a dodge that restarts it.
- Second-bar conversion. Cinderella stores Overheat in a separate bar and spends the whole 120 on the empowered charged attack. A partial bar is not a smaller version of the same result.
- Refund loop. Rex's ultimate returns a full Rage bar, so the correct play is to fire it early and start the next chain, not to save it for a finisher.
- Setup zone. Bentham's Contractual Circle converts a placed area into Funds income, so his damage depends on where the fight happens, not only on the button press.
Why this works: a bar is a promise about when the character becomes dangerous. Matching that promise to the fight — burst window, held target, or long phase — is the real team-building decision.
What is Synchronised Combat?
Synchronised Combat is the official name for swapping during a long animation. If you swap while the outgoing character is mid-charge or mid-skill, that character stays on the field until the animation finishes, and the incoming character can act immediately. For a short overlap, two characters are both present.
The community calls this "dual-axis" or 合轴 play. It is the highest-skill part of the combat system: you are not cancelling the animation, you are stacking a second character's actions on top of it. The safest place to learn it is a charged attack with a long tail — start the charge, swap at the last moment, and watch the first character finish while the second starts.
What is a Tactical Assault?
The Reactor gauge is shared by the whole party. Damage generates Droplets, and charged attacks collect them faster. Each full segment of the gauge stores one swap-triggered attack: the Tactical Assault.
The important detail is ownership. A Tactical Assault belongs to the character who enters, not to a specific pairing with the character who leaves. That is why any four characters can be fielded together, and why the old "you must match elements" advice is wrong for this game. Plan the swap around which incoming kit you want, not around an elemental reaction that does not exist.
Which attack types should you learn first?
| Type | Input | Main use |
|---|---|---|
| Basic attack | Light attack | Builds the resource bar; the third or fifth hit usually generates the most |
| Charged attack | Hold light attack | Collects Droplets faster; often has two levels |
| Pursuit attack | Light attack after a dodge | Closes distance and adds resource without restarting the combo |
| Counter attack | Light attack after a parry | The highest-value hit in most kits; preserves the chain |
| Skill | Skill button | Spends resource; no cooldown |
| Ultimate | Ultimate button | Needs a full charge; usually the largest single number in the kit |
Practise in this order: basic chain into charged attack, then parry into counter, then dodge into pursuit, and only then start stacking swaps. Trying to learn Synchronised Combat before the parry timing is settled is the most common way new players stall out in the first elite fight.
What are the default controls?
The published input list we have is from CBT1. CBT2 split block and dodge onto separate keys, so use this as a reference for what each input does rather than as a launch-day key map.
| Action | CBT1 input |
|---|---|
| Basic attack | Left mouse button |
| Charged attack | Hold left mouse button |
| Skill | Right mouse button |
| Ultimate | Q |
| Tactical Assault | Triggered by swapping |
| Execution | F, during the stun window |
| Block / parry | Single press Shift |
| Dodge | Double press Shift |
One exploration trap: holding the left button outside combat fires the Silverium grapple for harvesting. Silverium is traversal material, not the combat resource Droplet.
What does a real rotation look like?
A Rex sequence shows how the loop fits together without repeating his full damage table, which lives on the Rex build page:
- Open with the four-hit basic string to bank Rage. The fourth hit is the large one, so finish the string even if the target is almost dead.
- Fire Dual Truncheons, then Extended Truncheon. Each costs 60 Rage and adds one Volt Charge.
- At full Volt Charge, use Nunchucks Law. This is the chain's biggest non-ultimate hit.
- Fire Thunderous Judgement as soon as it is available. It refunds a full Rage bar, which re-arms the next string.
- Swap out on the ultimate's tail rather than waiting for the animation to finish, so the incoming character's Tactical Assault starts while Rex is still on screen.
The same shape applies to every kit: spend at the cap, not near it, and use the swap as part of the rotation rather than as an escape button.
What should a new player practise in the first hour?
Pick one character and learn the exact hit that generates their resource. The Detective generates Ammunition on hits three and five; Cinderella generates Vengeful Flame on every hit but pays out most on the fifth; Rex generates Rage on hits one to four with a 20-point fourth hit. Knowing the payout hit tells you when a parry is worth more than a dodge.
Then learn one break character. The difference between a 90-second elite fight and a 40-second one is usually whether the stun bar gets filled at all.
If you want the numbers behind the resource loops, the individual build pages cover them: the Detective, Cinderella, Rex. For how team composition changes the damage maths, read the Resonance guide and team building.
Common questions
Is there an elemental reaction system?
No. Silver Palace has seven Reactors, but they do not counter one another. Team damage comes from Resonance levels and from Tactical Assaults, not from fire melting ice.
Can I parry every attack?
Only yellow-ring attacks. Red-ring attacks are dodge-only, and some boss grabs require a quick-time input rather than either defensive option.
Does the game have a casual mode?
Yes, Casual Mode is listed among the official combat features. It reduces the timing pressure but does not remove the break-and-execute loop.
Why does my skill button do nothing?
You are out of resource, not out of cooldown. Check the named bar under the health bar and land a few more basic hits.